Battery switch on travel trailer function is crucial for managing your RV’s power. Understanding how to use and maintain this system is key to enjoying worry-free adventures. This guide will walk you through the different types of switches, safe connection and disconnection procedures, troubleshooting common problems, and essential maintenance tips to keep your travel trailer running smoothly.
We’ll cover everything from basic functionality and wiring diagrams to advanced topics like integrating your battery switch with solar panels and other power management systems. By the end, you’ll be confident in handling your battery switch and ensuring a reliable power supply for your next trip.
Understanding Battery Switch Functionality in Travel Trailers

A battery switch is a crucial component in any travel trailer’s electrical system, acting as the central control for your batteries. It allows you to isolate or connect your house batteries to the trailer’s electrical system, your tow vehicle’s charging system, or both, preventing accidental drain and ensuring efficient power management. Understanding how it works is essential for safe and reliable off-grid living.
Battery Switch Types
Travel trailers utilize various battery switch types, each with its own advantages and disadvantages. The choice often depends on the number of batteries and the level of control desired. Common types include single battery switches, dual battery switches, and more complex multi-stage switches. Single switches simply connect or disconnect a single battery bank, while dual switches allow for independent control of two battery banks (often a house bank and a starting bank).
Multi-stage switches offer even more granular control, sometimes incorporating features like a “both,” “off,” and individual battery selection.
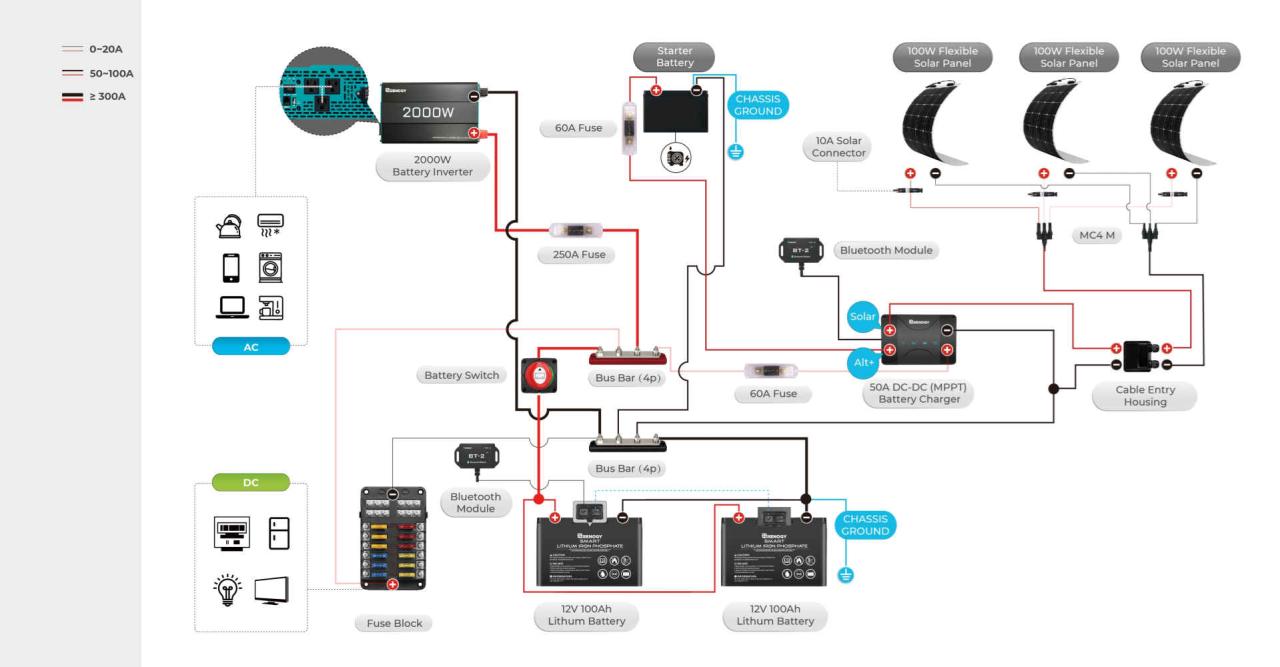
Typical Wiring Diagram
A basic travel trailer battery switch system typically involves the following components: the battery switch itself, the house batteries (often two 12V deep-cycle batteries connected in parallel), a charging source (either from the tow vehicle or a solar panel), and the trailer’s 12V electrical system (lights, appliances, etc.). The positive (+) cables from the batteries connect to the battery switch’s input terminals.
The output terminal from the switch then connects to the positive bus bar that feeds the trailer’s 12V system. A negative (-) cable connects directly from the batteries to the chassis of the trailer, completing the circuit. More sophisticated systems might include additional components like battery isolators or voltage sensors. A correctly wired system prevents accidental shorts and maximizes the lifespan of your batteries.
Comparison of Battery Switch Types, Battery switch on travel trailer function
| Feature | Single Battery Switch | Dual Battery Switch | Multi-Stage Battery Switch |
|---|---|---|---|
| Number of Batteries Controlled | One | Two | Two or more, with multiple switching options |
| Complexity | Simple | Moderate | High |
| Cost | Low | Moderate | High |
| Control | On/Off | On/Off for each battery bank | Multiple configurations (e.g., both batteries on, one battery on, both off, etc.) |
| Advantages | Simple, inexpensive | Independent control of two banks, prevents draining of starting battery | Fine-grained control, maximizes battery life |
| Disadvantages | Limited control | Can be more complex to wire | More expensive, complex wiring |
Connecting and Disconnecting Batteries
Connecting and disconnecting your travel trailer batteries using a battery switch is a crucial task for safely managing your power. Doing so incorrectly can lead to sparks, damage to your electrical system, or even injury. This section Artikels the correct procedure, emphasizing safety precautions and best practices for maintaining your battery connections.
Properly connecting and disconnecting your batteries ensures the longevity of your battery system and prevents potential hazards. Always prioritize safety when working with batteries, as they contain corrosive chemicals and can generate significant electrical current.
Battery Connection and Disconnection Procedure
Before starting any work, always ensure the battery switch is in the “OFF” position. This isolates the batteries from the trailer’s electrical system, minimizing the risk of accidental shocks or shorts. Wear safety glasses to protect your eyes from potential splashes of battery acid.
So, you’re an audiophile who travels? Awesome! Check out this guide on creating the perfect audiophile travel setup to ensure your listening experience doesn’t suffer on the road. Don’t forget to sort out your insurance beforehand; getting Aon travel insurance is a smart move to protect your gear and yourself during your adventures. Having the right insurance gives you peace of mind, letting you focus on enjoying your amazing music both at home and abroad.
- Turn the Battery Switch to “OFF”: This is the most crucial first step. It completely disconnects the batteries from the trailer’s electrical system.
- Identify Positive and Negative Terminals: The positive terminal is usually marked with a “+” symbol and often red. The negative terminal is marked with a “-” symbol and is usually black.
- Connect the Positive Cable First: Securely attach the positive (+) cable to the positive terminal of the battery. Make sure the connection is tight and free of corrosion.
- Connect the Negative Cable: Next, attach the negative (-) cable to the negative terminal of the battery. Again, ensure a secure and corrosion-free connection.
- Turn the Battery Switch to “ON”: After connecting both cables, carefully turn the battery switch to the “ON” position. Check for any sparks or unusual sounds.
- Disconnecting the Batteries: To disconnect, reverse the process. First, turn the battery switch to the “OFF” position. Then, disconnect the negative (-) cable first, followed by the positive (+) cable.
Battery Safety Precautions
Working with batteries requires careful attention to safety. Ignoring these precautions can lead to serious injury or damage to your equipment.
- Always wear safety glasses to protect your eyes from splashes of battery acid.
- Wear gloves to protect your hands from corrosion and acid.
- Ensure adequate ventilation to prevent inhalation of potentially harmful gases.
- Never allow tools or metal objects to come into contact with both terminals simultaneously, as this can cause a short circuit.
- Keep flames and sparks away from batteries, as they are flammable and can explode under certain conditions.
- If battery acid contacts skin or eyes, immediately flush the affected area with plenty of water and seek medical attention.
Maintaining Battery Terminals and Connections
Regular maintenance of your battery terminals and connections will extend the life of your batteries and prevent problems.
- Clean terminals regularly using a wire brush or terminal cleaner to remove corrosion. A baking soda and water paste can also be effective.
- Apply a corrosion inhibitor to the terminals after cleaning to prevent future corrosion.
- Check connections periodically to ensure they are tight and secure.
- Inspect cables for any damage or fraying and replace them if necessary.
Visual Guide for Connecting and Disconnecting Batteries
The visual guide would depict a step-by-step process, using clear illustrations. Panel 1 shows the battery switch in the “OFF” position. Panel 2 shows the positive cable being connected to the positive terminal, with safety glasses and gloves clearly visible on the person performing the task. Panel 3 illustrates the negative cable being connected to the negative terminal.
Panel 4 shows the battery switch being turned to the “ON” position. Panel 5 shows the reverse process for disconnecting, with the negative cable being disconnected first, followed by the positive cable. Each panel includes clear labels and arrows indicating the correct procedure. A warning symbol (e.g., a lightning bolt inside a triangle) is prominently displayed throughout to emphasize safety.
Troubleshooting Common Battery Switch Issues: Battery Switch On Travel Trailer Function
Dealing with a malfunctioning battery switch in your travel trailer can be frustrating, leaving you without power when you need it most. Understanding the common problems and how to diagnose them is key to getting back on the road quickly. This section will guide you through identifying and resolving typical battery switch issues.
Identifying Common Problems and Their Causes
Several issues can arise with your travel trailer’s battery switch. A common problem is a complete lack of power to the trailer’s 12-volt system. This could be due to a blown fuse within the switch itself, a faulty switch, corroded connections at the battery terminals or switch, or even a problem with the wiring leading to or from the switch.
Another common issue is inconsistent power, where you might have power intermittently. This points to loose connections, a failing switch, or corrosion within the switch or wiring. Finally, low power, even when the batteries appear fully charged, could indicate a high-resistance connection somewhere in the system, a partially shorted switch, or a failing battery.
Diagnosing a Faulty Battery Switch
Diagnosing a faulty battery switch requires a systematic approach. First, visually inspect the switch for any obvious signs of damage, such as burn marks, loose connections, or corrosion. Check all wiring connections for tightness and corrosion. Next, use a multimeter to test the voltage at the battery terminals and at the output of the switch. If the voltage at the battery terminals is significantly higher than at the switch output, you likely have a problem within the switch or its connections.
A low voltage reading at the battery terminals, even with seemingly fully charged batteries, suggests a problem with the batteries themselves or a high resistance in the wiring. Remember to always disconnect the negative battery terminal before working on any electrical components.
Troubleshooting Steps for Common Power Problems
Let’s break down troubleshooting steps for the common problems:No Power: First, check the fuses both in the switch and in any related fuse boxes. Replace any blown fuses. Next, check the battery connections for corrosion and tightness. Clean any corrosion and ensure all connections are secure. If the problem persists, test the voltage at the battery terminals and at the switch output using a multimeter.
If there’s no voltage at the switch output, the switch itself is likely faulty and needs replacement.Low Power: Low power often points to weak batteries, a bad connection, or a parasitic drain. Check battery voltage; if low, recharge or replace the batteries. Inspect all connections for corrosion and tightness, paying close attention to the switch and battery terminals. A parasitic drain (a constant small draw of power even when the trailer is off) can slowly deplete the batteries.
This requires more in-depth troubleshooting to find the source of the drain.Inconsistent Power: Intermittent power is often a sign of loose or corroded connections. Thoroughly inspect all connections, cleaning and tightening as needed. Pay particular attention to the connections at the battery terminals and the switch itself. If the problem continues, the switch may be failing internally and needs replacement.
Troubleshooting Flowchart
A flowchart can simplify the troubleshooting process. Imagine a diagram with a starting point (“No Power/Low Power/Inconsistent Power”). Branches would then lead to:
1. Check Fuses
If fuses are blown, replace them. If not, proceed to the next step.
2. Inspect Connections
Look for corrosion and loose connections at the battery terminals and the switch. Clean and tighten as needed.
3. Test Voltage
Use a multimeter to measure voltage at the battery and at the switch output. Low voltage at the switch output indicates a problem with the switch or wiring.
4. Check Batteries
Test battery voltage. Low voltage indicates weak or faulty batteries.
5. Replace Switch
So, you’re an audiophile who travels? Awesome! Check out this guide on building the perfect audiophile travel setup for amazing sound on the go. Don’t forget to sort out your insurance before you jet off; getting Aon travel insurance is a smart move for peace of mind, covering everything from lost luggage to medical emergencies.
That way, you can focus on enjoying your trip and your killer tunes!
If all else fails, the battery switch may need to be replaced. This would be the final branch of the flowchart.
Battery Switch and Power Management Systems
Your travel trailer’s battery switch is a key component in a larger power management system. It doesn’t operate in isolation; its function is intertwined with other power sources and devices, creating a complex but essential network for keeping your RV running smoothly. Understanding these interactions is crucial for maximizing efficiency and preventing problems.The battery switch acts as the central control point for your house batteries, allowing you to disconnect them from the rest of the system when needed, for safety or storage.
However, the effectiveness of this switch depends heavily on how it interacts with other power sources, like solar panels and the converter. For example, a poorly integrated system might lead to backfeeding, potentially damaging sensitive electronics or even causing a fire. Proper integration is key to safe and efficient power management.
Power Management Strategies with Battery Switches
Different power management strategies utilize the battery switch in various ways. A simple system might just use the switch to connect or disconnect the batteries from the trailer’s 12V system. More advanced systems incorporate automatic charging from solar panels or a generator, prioritizing different power sources based on availability and battery charge level. Some sophisticated systems even use the battery switch in conjunction with a battery monitor to provide real-time data on battery health and power consumption, allowing for more informed decision-making.
A common strategy is to use the battery switch to isolate the batteries when not in use, preventing parasitic drain, and then selecting the appropriate power source (shore power, generator, or solar) to charge the batteries.
Selecting the Appropriate Battery Switch
Choosing the right battery switch is critical for safety and performance. The amperage rating is the most important factor; this determines the maximum current the switch can handle without overheating or failing. You need a switch with an amperage rating that comfortably exceeds the combined amperage draw of all the 12V devices in your travel trailer. Ignoring this can lead to a dangerous situation.
For instance, a travel trailer with high-power appliances like air conditioning or a microwave will require a much higher amperage rating than one with only basic lighting and a small refrigerator. Consider also the number of batteries you have and whether you need a switch that can handle multiple banks of batteries.
Factors to Consider When Choosing a Battery Switch
Choosing the right battery switch involves careful consideration of several factors:
- Amperage Rating: This should significantly exceed the total amperage draw of your 12V appliances. Underestimating this can lead to switch failure and potential damage.
- Number of Batteries: Select a switch capable of handling the number of battery banks in your system. Some switches handle single banks, while others accommodate two or more.
- Type of Switch: Consider manual switches (simple and affordable) or automatic switches (more complex but offer greater convenience and control).
- Mounting Style: Ensure the switch’s mounting style is compatible with your travel trailer’s electrical panel.
- Safety Features: Look for switches with features like overload protection to prevent damage from excessive current draw.
- Brand Reputation: Choose a reputable brand known for reliable and durable products.
Battery Switch Maintenance and Replacement
Keeping your travel trailer’s battery switch in good working order is crucial for reliable power. Regular maintenance prevents unexpected breakdowns and extends the lifespan of your switch, saving you money and frustration down the road. Neglecting maintenance can lead to premature failure, potentially leaving you stranded without power.
Recommended Battery Switch Maintenance Schedule
A simple visual inspection should be part of your regular pre-trip checklist. More in-depth maintenance is recommended annually or every 1-2 years depending on usage and environmental conditions. This includes checking for corrosion on the terminals and connections, ensuring all bolts are tight, and inspecting the switch mechanism for any signs of wear or damage. Lubricating moving parts with a suitable electrical contact cleaner and lubricant can also help prevent corrosion and ensure smooth operation.
For switches exposed to the elements, more frequent inspections are advisable.
Replacing a Faulty Battery Switch
Replacing a battery switch is a relatively straightforward task, but safety precautions are paramount. Before beginning, always disconnect the negative battery terminal to prevent accidental shocks or short circuits. This is the most important step to ensure your safety. Once disconnected, carefully remove the old switch, noting the wiring configuration before disconnecting any wires. This will help you reconnect everything correctly during the installation of the new switch.
Install the new switch, ensuring all connections are secure and tight. Reconnect the negative battery terminal last.
Importance of Using Appropriate Tools and Safety Equipment
Using the correct tools is essential for a safe and efficient battery switch replacement. You’ll need a wrench or socket set appropriate for the switch’s terminal bolts, a screwdriver for any mounting screws, and possibly wire strippers and crimpers if you need to replace any wiring. Safety glasses should always be worn to protect your eyes from sparks or debris.
Rubber gloves are highly recommended to prevent electrical shocks. Working in a well-ventilated area is also advisable, especially when working with batteries which can release potentially harmful gases.
Safe Disposal of Old Batteries
Proper disposal of old batteries is crucial for environmental protection. Lead-acid batteries contain hazardous materials and should not be thrown in the regular trash. Many auto parts stores, recycling centers, and waste management facilities offer battery recycling programs. Check with your local authorities to find the nearest battery recycling location. They will safely dispose of the old battery and ensure the proper recycling of its components.
Never attempt to dismantle or dispose of the battery improperly; always follow local regulations and guidelines.
Mastering your travel trailer’s battery switch is a simple yet impactful step towards maximizing your RV experience. By understanding its function, performing regular maintenance, and knowing how to troubleshoot common issues, you can ensure reliable power for all your on-the-road adventures. Remember safety first – always disconnect batteries before working on the system, and consult a professional if you’re unsure about any aspect of the process.
Happy travels!
Common Queries
How often should I check my battery switch?
Inspect your battery switch at least once a month, checking for corrosion and loose connections.
What should I do if my battery switch is stuck?
Try lubricating the switch mechanism with a penetrating lubricant. If it remains stuck, you may need to replace it.
Can I use a battery switch with lithium batteries?
Yes, but ensure your switch is compatible with the higher voltage and current demands of lithium batteries. Some switches are specifically designed for lithium use.
How do I know which size battery switch I need?
The appropriate size depends on the amperage of your batteries and other electrical components. Check your RV’s documentation or consult a qualified electrician.
